1. Understanding Flooring LVP
1.1 What is Flooring LVP?
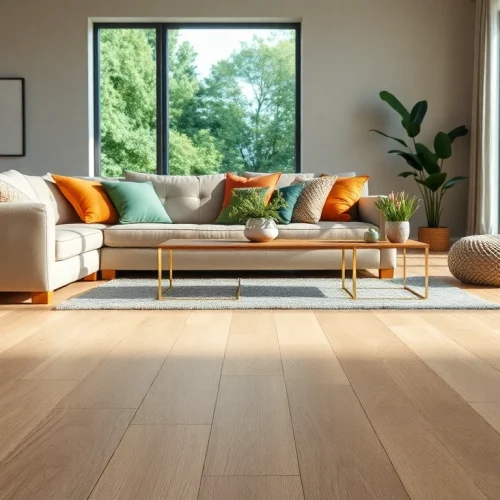
Flooring LVP, or Luxury Vinyl Plank, is an innovative flooring solution that mimics the appearance of natural materials such as hardwood or stone while offering enhanced durability and affordability. Made from multiple layers, including a robust wear layer, a design layer, and a backing layer, LVP provides a realistic look and feel combined with resistance to wear and tear, moisture, and stains. This versatility makes it an attractive option for both residential and commercial spaces. With its ease of maintenance and installation, flooring LVP has gained traction as a leading choice for modern flooring needs. Explore more about the functionality and aesthetic appeal of flooring lvp.
1.2 Key Features of Flooring LVP
One of the standout features of flooring LVP is its water resistance, making it ideal for areas prone to spills, such as kitchens and bathrooms. The product often features a rigorous wear layer that protects against scratches and scuffs, ensuring longevity in high-traffic areas. Additionally, flooring LVP is designed for comfort underfoot, providing warmth and cushioning that hard flooring surfaces cannot match. Its sound absorption properties also help reduce noise, making it an appealing option for multi-story homes and commercial buildings.
1.3 Benefits of Choosing Flooring LVP
The benefits of flooring LVP are numerous, including its affordability compared to traditional hardwood options without sacrificing aesthetics. Installation can be completed quickly, often without the need for glue or nails, thanks to various installation methods like click-lock. The floor’s maintenance is relatively simple, primarily requiring regular sweeping and occasional damp mopping. Furthermore, due to advancements in production technology, flooring LVP now offers an extensive range of styles, textures, and colors, allowing homeowners to find the perfect match for their decor.
2. Varieties of Flooring LVP
2.1 Design Options for Flooring LVP
Flooring LVP comes in a vast array of design options that can suit any aesthetic preference. From classic wood grains to contemporary tiles, the design versatility allows consumers to choose styles that align with their desired ambiance. Popular plank sizes often mimic the scale of natural wood boards, enhancing the authentic look and feel. Moreover, some collections even offer embossed textures that add depth and realism to the surface, making it nearly indistinguishable from real wood or stone.
2.2 Texture and Finish Choices
The texture and finish of flooring LVP significantly impact the final aesthetic. Options can range from matte to high-gloss finishes, catering to different design philosophies and preferences. Additionally, embossed textures can create a tactile experience, enhancing the overall quality and charm of the flooring. Advanced manufacturing techniques also allow for registered embossing, where the texture aligns perfectly with the visual grain, significantly enhancing realism.
2.3 Color Palettes for Flooring LVP
The color choices available in flooring LVP are vast and can fit a multitude of design schemes. Whether you prefer earthy tones, vibrant shades, or neutral palettes, there’s a hue for everyone. Dark wood shades can create a dramatic look, while lighter tones can open up spaces and create a sense of airy openness. Additionally, stain-resistant and fade-resistant options help maintain the integrity of color over time, ensuring that your flooring keeps its fresh appearance for years to come.
3. Installation Process of Flooring LVP
3.1 Preparation Before Installation
Proper preparation is crucial before installing flooring LVP. First, assess the subfloor to ensure it is clean, dry, and level, as any imperfections can affect the final result. It’s recommended to acclimate your flooring planks in the room where they will be installed for at least 48 hours. This step allows the planks to adjust to the room’s temperature and humidity, reducing the likelihood of warping or expansion after installation.
3.2 Step-by-Step Installation Guide
- Remove existing flooring: Clear the space of any existing flooring, ensuring a clean work environment.
- Prepare the subfloor: Clean and level the subfloor, repairing any damages to create a smooth surface.
- Acclimate the flooring: Let the flooring LVP acclimate in the intended space.
- Install underlayment: Depending on the type of LVP, consider installing an appropriate underlayment for sound absorption and cushioning.
- Start laying planks: Begin in a corner and work your way across the room, using spacers to allow for expansion around the edges.
- Cut as needed: Use a utility knife or saw to cut planks to fit around obstacles.
- Finish installation: Once the last plank is in place, remove spacers and install baseboards or trim for a polished look.
3.3 Common Installation Mistakes to Avoid
Many common mistakes can arise during the installation of flooring LVP. One frequent error is neglecting to acclimate the planks properly, which can result in warping or gaps as temperatures change. Another mistake is failing to use spacers, which can cause the planks to buckle over time. Additionally, homeowners should be cautious of over-tightening installation methods, which can lead to damage. Ensuring the subfloor is completely prepared and following the manufacturer’s instructions meticulously can help mitigate these issues.
4. Maintenance Tips for Flooring LVP
4.1 Cleaning Best Practices
Maintaining flooring LVP is straightforward, requiring minimal effort to keep it looking pristine. Regularly sweeping or vacuuming to remove dirt and debris can prevent scratches. It’s advisable to use a damp mop with a pH-neutral cleaner specifically designed for vinyl flooring to avoid damage from harsh chemicals. Additionally, using felt pads under furniture legs can prevent marks and scratches, prolonging the life of your flooring.
4.2 Protecting Your Flooring LVP
To protect your flooring LVP from damage, consider placing area rugs or mats at entry points to capture dirt and moisture. Additionally, avoid dragging heavy objects across the surface, which can lead to scratches or dents. In high-traffic areas, regular maintenance can significantly extend the life of your flooring; ensure that furniture is not directly placed on the flooring without adequate protective measures in place.
4.3 When to Seek Professional Help
While maintenance for flooring LVP is relatively simple, there are times when professional help may be warranted. In cases of significant damage such as deep scratches, dents, or discoloration, consulting with a professional might be necessary for effective repair. Additionally, if the original installation seems questionable, seeking expert assistance can ensure that your flooring remains in optimal condition.
5. Frequently Asked Questions about Flooring LVP
5.1 How long does flooring lvp last?
Flooring LVP can last anywhere from 10 to 25 years, depending on quality, installation, and maintenance practices.
5.2 Is flooring lvp water resistant?
Yes, flooring LVP is highly water-resistant, making it suitable for bathrooms, kitchens, and basements.
5.3 Can flooring lvp be installed over existing floors?
In many cases, flooring LVP can be installed over existing floors, provided they are level and in good condition.
5.4 What is the cost range for flooring lvp?
The cost of flooring LVP typically ranges from $2 to $7 per square foot, depending on style and brand.
5.5 Are there eco-friendly options for flooring lvp?
Yes, many manufacturers offer eco-friendly flooring LVP options made from recycled materials and featuring low-VOC emissions.